

Once we had the plywood in place, using a very short pencil (about an 1″ long), we marked many of the empty holes in the trailer frame on the plywood. Then removed the ply once again and drilled through holes in the plywood. Following that, we reinstalled the plywood decking with the new through holes.
From there, we carefully measured each though hole and transferred those measurements to several 2×3’s that we drilled through as well. This allowed us to lay the 2×3’s around top parameter of the decking and run through bolts through the 2×3’s, plywood and into the existing holes on the trailer frame. Using washers and lock nuts, we secured the bots. This created an excellent platform to build from.
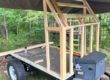
Once we had everything in place and bolted down, we started adding our studs (vertical 2×3’s) to create the walls. We used a 16″ on center layout, which means we positioned all our studs every 16″ so that the center of the 2×3 was in the middle of the line marked out at 16″. You can really do what you’d like here as long as you don’t get too much distance between your studs and you stay consistent throughout the process.
Before you start this part, be sure and know exactly how tall you want your overlander trailer to be. We knew we wanted to use full sheets of 4′ x 8′ plywood on the walls so this would mean that we needed to account for the horizontal top 2×3 that would eventually lay along the top of our studs as well as the 1/2″ plywood on top. This meant that our studs needed to be 44″ in our case.

Note the plywood decking and 2x3s along the parameter.
One more thing to mention, be as thoughtful as possible about how water will penetrate your design. While we ran our 1/2″ plywood on the sides flush with the top plywood, you might actually want to run your top sheet long to cover the end of the side sheets. We simply filled all our cracks with silicone to prevent any water from getting in.
At this stage, you want to take care to ensure you keep your new construction square. This can be done a few different ways including using a level, framers square, and a tape measure.


As we progressed along, we needed to also be sure and frame out both what would be the slide out kitchen as well as the back hatch.

Where our slide out kitchen will be.
Once that was all complete, it was time to start sheathing it with the plywood. For our walls, we used 1/2″ treated plywood and eventually treaded it with several coats of solid deck stain and sealed all the screw holes and cracks with silicone.


With that complete, it was time to get to work on the back hatch and slide out kitchen, which we will cover in the next post. Here is a brief YouTube video of our framing process and please give us a like and subscribe 🙂


You have remarked very interesting points! ps decent web site. “The empires of the future are the empires of the mind.” by Sir Winston Leonard Spenser Churchill.